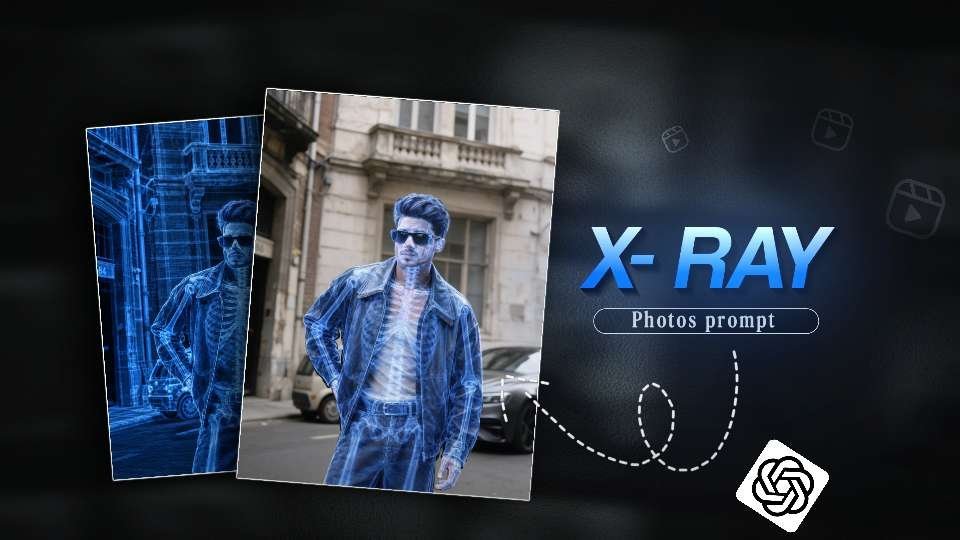
X-ray photo editing is turning ordinary portraits into futuristic social media visuals with a single AI-assisted transformation. The effect combines a natural face and pose with a luminous skeleton, transparent body details, and cool cinematic color, creating an image that feels both realistic and imaginative.
This guide explains how to plan the edit, choose the right reference photo, improve the final result, and use the two included prompt blocks effectively. The goal is not to create a medical scan. Instead, it is to produce a polished creative portrait for reels, short-form videos, profile posts, thumbnails, and digital artwork.
What Is X-Ray Photo Editing?
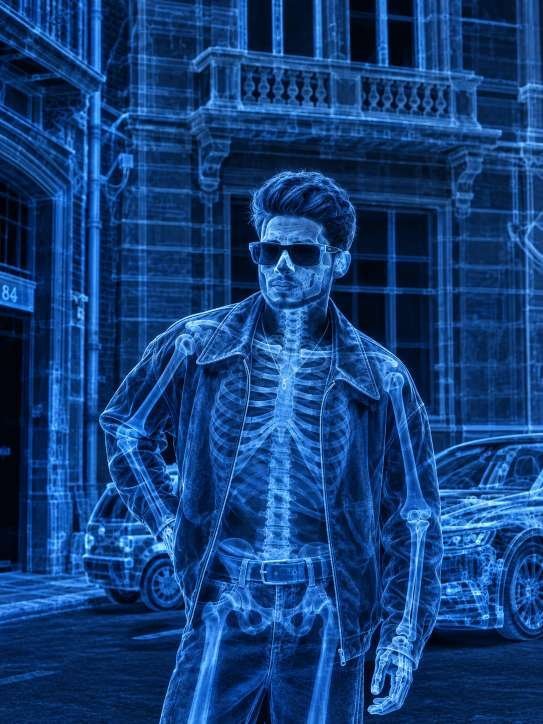
X-ray photo editing uses an AI image generator to reinterpret a normal portrait as a stylized radiographic image. Depending on the instructions and source photo, the result may show a glowing blue skeleton, lightly transparent clothing, controlled highlights, and a dark background that makes the anatomy-inspired effect stand out.
The strongest edits preserve the person’s identity, body proportions, expression, and original pose. They add the visual effect without turning the subject into an illustration or changing the image into an unrecognizable fantasy character. That balance between realism and science-fiction is what makes the trend so effective.
It helps to understand the difference between creative imagery and real radiography. For background on actual X-ray imaging, the radiography overview on Wikipedia is a useful reference. A social media transformation is an artistic simulation, not a diagnostic image and should never be treated as one.
Why X-Ray Photo Editing Works on Social Media
Social feeds move quickly, so unusual visual ideas have an advantage. A familiar portrait becomes instantly more memorable when the viewer notices a controlled blue glow and a transparent skeletal structure beneath the clothing. The contrast creates a strong pause-and-look moment without requiring a complicated scene.
The effect also works across several formats. A close portrait can emphasize the face and shoulders, while a half-body image can reveal the bone structure and clothing layers. For a reel cover or thumbnail, a dark urban background gives the subject clear separation and leaves room for readable text.
Another benefit is the before-and-after story. Creators can show the original image first, then reveal the AI-enhanced version with a beat drop or quick transition. This makes the edit more than a static filter; it becomes a simple visual narrative that encourages viewers to watch again.
How to Build an X-Ray Photo Editing Workflow
A reliable x-ray photo editing workflow begins with the source image rather than the effect. Choose a sharp portrait with visible shoulders, torso, or legs, depending on how much of the skeleton you want to reveal. Good lighting, a clean pose, and an uncluttered background give the generator more information to work with.
Select a suitable photo. Use a well-lit image with the subject facing the camera or turned at a clear angle. Avoid heavy motion blur, extreme cropping, and poses where the arms or torso are completely hidden.
Define the visual goal. Decide whether you want a subtle transparent overlay or a bold glowing skeleton. Stating the mood, color, lighting, and realism level helps prevent random results.
Protect identity and anatomy. Ask the tool to retain facial structure, body proportions, hands, clothing shape, and pose. These details matter more than adding excessive effects.
Refine in small steps. If the first result looks too bright or artificial, adjust the glow, contrast, transparency, or background separately instead of rewriting every instruction at once.
Export for the destination. Check the crop and resolution before posting. A portrait edit for a story or reel cover needs a different composition from a square profile post.
An image-to-image tool is usually a better choice than a text-only generator because it can use the uploaded portrait as a visual anchor. Adobe’s official Firefly page provides an example of how modern creative AI tools support image generation and editing workflows.
Realistic X-Ray Photo Editing Prompts
The following prompt sections are designed to support a consistent result while leaving room for the uploaded reference image to guide identity and composition. Use each block with a suitable portrait, then inspect hands, facial details, transparency, and background edges before publishing.
Natural Blue Skeleton Portrait Effect
This direction is suited to a clean, believable transformation where the original person remains the main subject. It emphasizes controlled transparency, realistic texture, and a cool blue anatomical glow rather than an exaggerated horror look.
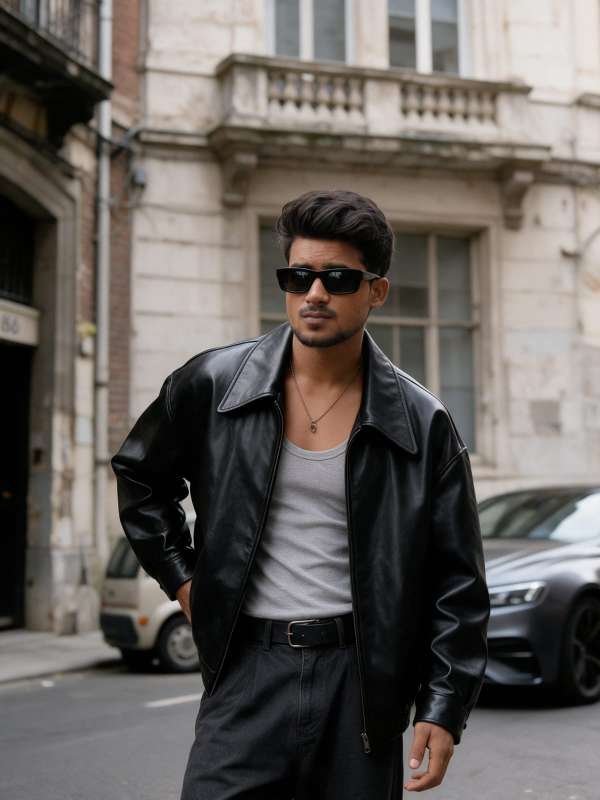
1. Overall Style Create an ultra-realistic high-end street-fashion editorial photograph based closely on the uploaded reference image. Recreate the same overall composition, camera perspective, subject positioning, pose, styling, architecture, lighting, colors, depth of field, and natural photographic appearance. The final image must look like a genuine professional camera photograph, not AI-generated or digitally illustrated. 2. Subject One young adult male standing outdoors on a European-style urban street. Slim-to-average natural physique. Realistic human body proportions. Natural shoulders, arms, chest, waist, and neck proportions. Do not make the body broader, bulkier, muscular, or heavier. Maintain a natural, effortless fashion-model appearance. 3. Pose & Body Position Subject standing casually and naturally. Upper body slightly relaxed with a subtle forward/sideward orientation. Both hands placed naturally inside the front pockets of the pants. Elbows slightly bent outward. Shoulders relaxed rather than squared. Head slightly tilted/downward. Face angled subtly toward the camera. Relaxed, serious, understated expression. Recreate the same body posture and overall silhouette as the reference. Do not introduce a different pose, hand position, leg position, or body movement. 4. Framing & Composition Vertical fashion photograph. Approximately waist-up / 3/4-body framing, with the lower portion extending toward the bottom edge. Subject positioned near the center of the frame. Head located around the upper-middle portion of the image. Leave enough environmental space around the subject to clearly show the architecture and parked cars. Preserve the reference’s close, immersive street-photography composition. No excessive zoom-out. No unnecessary cropping. 5. Camera Perspective Eye-level to slightly low camera perspective. Camera positioned fairly close to the subject. Natural perspective with realistic proportions. Moderate compression similar to an approximately 50–85mm full-frame lens. No extreme wide-angle distortion. Subject should feel naturally integrated into the environment. 6. Hairstyle 7. Face & Identity If using a user’s uploaded photo as the identity reference: Preserve the user’s exact facial identity. Face 100% locked to the uploaded identity reference. Do not alter facial structure, proportions, jawline, eyes, nose, lips, or overall facial geometry. Preserve natural skin texture, pores, and small imperfections. No beauty filter, face smoothing, artificial symmetry correction, face slimming, or facial enhancement. The sunglasses may partially obscure the eyes naturally, but the underlying facial structure must remain unchanged. 8. Expression Calm, serious, slightly mysterious fashion-editorial expression. Lips naturally relaxed. No smile. No exaggerated emotion. Head slightly lowered, creating a subtle cool and effortless mood. 9. Sunglasses Large rectangular black sunglasses. Thick dark frame. Dark almost-black lenses. Sunglasses positioned naturally across the bridge of the nose. Realistic reflections on the lenses. No futuristic or oversized cartoon appearance. 10. Clothing — Leather Jacket Oversized black leather jacket. Relaxed, slightly boxy streetwear fit. Soft natural leather texture. Large pointed/open collar. Long sleeves with slightly loose cuffs. Jacket partially open in the front. Visible natural folds and creases throughout the leather. Realistic subtle highlights reflecting the ambient daylight. Dark black color with slightly varied leather tones rather than perfectly flat black. 11. Inner Shirt Simple fitted white/light-gray sleeveless tank top underneath the jacket. Clean minimal design. Natural fabric texture. Slightly visible neckline and upper chest. Tank top should remain mostly concealed by the leather jacket. 12. Necklace Thin delicate metallic chain around the neck. Small simple pendant hanging around the upper chest. Natural positioning and subtle metallic reflection. Do not make the necklace oversized or visually dominant. 13. Pants Black/dark charcoal trousers or jeans. Relaxed straight-to-loose fit. Natural fabric folds around the waist and pockets. Dark monochromatic styling matching the jacket. Waist area naturally visible beneath the open jacket. 14. Hands Both hands naturally inserted into the front pockets. Fingers should be anatomically correct. Natural wrist and hand proportions. No distorted fingers, extra fingers, fused fingers, or unnatural hand shapes. Hands should look relaxed rather than tightly gripping the pockets. 15. Architecture / Background Historic European urban architecture. Aged stone/plaster building facades. Weathered beige-gray walls with visible natural aging and texture. Ornamental architectural details. Decorative stone balcony with classical balustrade. Large windows and traditional European building elements. A darker doorway visible on the left side. Small building number plaque reading “86” on the left-side wall. Mix of beige stone, gray weathered surfaces, and reddish-brown brick elements. Background should feel like an authentic European city street, not a digitally constructed set. 16. Parked Cars Several realistic modern cars parked along the street behind the subject. Beige/tan compact car visible toward the left/lower background. Dark gray luxury sedan/coupe visible toward the right. Natural reflections on vehicle windows and body panels. Cars should remain slightly less prominent than the subject. Realistic street-level perspective. 17. Street Environment Narrow urban European street. Authentic pavement and curb. Subtle everyday city details. No crowds dominating the scene. Quiet, sophisticated metropolitan atmosphere. Environment should feel naturally photographed rather than staged. 18. Lighting Natural soft daylight. Slightly overcast / diffused daylight quality. Soft shadows rather than harsh direct sunlight. Natural highlights on the leather jacket and hair. Gentle ambient light across the face and clothing. Preserve darker shadows underneath the jacket and around the architecture. No artificial studio lighting. 19. Color Grading Cinematic muted urban color palette. Warm beige and gray architectural tones. Deep blacks in the leather jacket and sunglasses. Slightly desaturated overall colors. Natural skin tones. Subtle film-like contrast. No excessive HDR. No neon colors or artificial oversaturation. 20. Depth of Field Subject remains sharply detailed. Background moderately blurred but still recognizable. Natural optical depth of field. Soft separation between subject and architecture. Realistic bokeh around distant cars and background elements. Avoid excessive artificial blur. 21. Image Quality Ultra-high-resolution professional photography. Extremely realistic skin texture. Detailed leather texture. Realistic hair strands. Accurate fabric texture. Natural reflections on sunglasses and cars. Physically realistic shadows and highlights. Subtle authentic photographic grain. 22. Camera Look Professional full-frame camera aesthetic, approximately 50–85mm lens, around f/2–f/2.8, natural perspective, realistic optical compression, sharp subject with moderate background separation, natural dynamic range, documentary/editorial street-fashion photography. 23. Realism Requirements Photorealistic human anatomy. Natural skin pores and texture. Realistic leather reflections. Realistic fabric wrinkles. Accurate hands and fingers. Realistic hair strands. Natural environmental reflections. No plastic skin. No CGI appearance. No artificial face enhancement. No exaggerated muscularity. 24. Composition Lock Recreate the reference composition as closely as possible: same approximate camera height, subject scale, subject placement, head position, body orientation, hand placement, background architecture, parked-car arrangement, and visual balance. Do not randomly change the camera angle or reposition the subject. 25. Negative Prompt Avoid: cartoon, illustration, 3D render, CGI, AI-looking skin, plastic skin, excessive skin smoothing, beauty filter, face reshaping, face slimming, body enhancement, muscular body, broad shoulders, oversized muscles, distorted anatomy, extra fingers, missing fingers, malformed hands, duplicated objects, warped architecture, extreme wide-angle distortion, excessive HDR, oversaturation, excessive blur, artificial bokeh, unrealistic leather, floating objects, incorrect shadows, different pose, different hand position, different camera angle, excessive zoom-out, unnecessary crop, low resolution, unnatural facial expression. Most important : keep my face and hairstyle, Eyes and nose sharp focus and same, add Highlights and shadow to Match with background
For the cleanest outcome, use a photo with visible clothing boundaries and even lighting. Reduce the glow if it hides the face or overwhelms the outfit, and check that the skeleton follows the body’s actual position.
Cinematic Street-Style X-Ray Portrait
This approach works well when the reference image has a confident fashion pose or an atmospheric city background. It combines editorial styling with the transparent body effect, creating a dramatic result that still feels like a photograph.
Transform the provided image into a realistic RAY SCAN version of the exact same image. Treat the original image as a completely locked composition. Preserve the exact camera angle, perspective, framing, crop, lens perspective depth, subject positioning, body pose, object placement, proportions, scale and spatial relationships. DO NOT move, resize, rotate, reposition, replace or redesign anything in the image. The only change should be the visual transformation from a normal photograph into an X ray scan. Convert every visible subject, object and environmental element into its appropriate X ray interpretation, based naturally on what that element is. If there is a human or animal in the image, reveal the anatomically correct internal skeletal structure beneath the body. Show the skull, spine, rib cage, shoulders, arms, hands, pelvis, legs, joints and other visible bones naturally aligned to the person’s exact original pose. The skeleton must perfectly track the original body position and proportions. Preserve the body’s outer silhouette as a very dark, subtle translucent outline surrounding the internal skeleton. If there are objects such as luggage, bags, boxes, electronics, furniture, watches, cameras, shoes or other products, make their exterior surfaces dark and semi transparent while revealing believable internal components, structures, materials and contents appropriate to that specific object. If there is a vehicle, reveal realistic mechanical structures such as the chassis, engine components, suspension, wheels, seats, wiring and internal construction while maintaining the exact vehicle silhouette. If there is a building or architectural structure, reveal its structural framework, beams, columns, pipes, wiring, floors, walls and internal construction naturally within the existing geometry. Apply the same logic automatically to ANY type of object present in the image. Determine what the subject is and reveal the believable internal structures that would naturally exist inside it. The result should look like the entire original photograph was captured using an advanced cinematic X ray scanning system. VISUAL STYLE Use a strict BLACK AND BLUE X RAY COLOR PALETTE. The image should be predominantly deep black and near black. Internal bones, structures, mechanisms, edges and important scanned details should glow in varying intensities of electric blue, deep blue and cold luminous blue. Bones should be clearly visible and brighter than surrounding soft tissue. Dense materials should appear brighter blue while thinner or less dense materials appear darker and more translucent. Exterior surfaces should remain extremely dark, semi transparent and ghostlike so the internal structures become the main visual focus. Use natural X ray density variation, overlapping translucent layers, subtle volumetric depth and realistic penetration through materials. Maintain strong contrast with a mostly black image and controlled blue illumination. Do not turn the image into a neon illustration or cyberpunk artwork. It must still feef like a believable medical, industrial or security X ray scan, only presented with a cinematic black and blue aesthetic. Keep fine internal details extremely sharp and intricate. Preserve the original depth of field relationships where possible while making the X ray structures readable. ABSOLUTE COMPOSITION LOCK The final X ray image must perfectly overlay the original image if both were stacked on top of each other. Every person must remain in the exact same location and pose. Every object must remain in the exact same location. Every background element must remain in the exact same location. Keep the exact original framing. Keep the exact original aspect ratio: Keep the exact original perspective. Keep the exact original camera position. Keep the exact original proportions. Do not zoom. Do not crop. Do not reframe. Do not change facial or body proportions. Do not change poses. Do not simplify the scene. Do not remove background elements. Do not add new objects. Do not alter the environment. Do not change the composition. Do not create a different scene. Only convert the existing image into its black and blue X ray equivalent, revealing the anatomically, mechanically or structurally appropriate internal details of everything already present in Most important : xray effect should be perfectly fits on subject and car accurate 100% same
Keep the surroundings slightly darker than the subject so the blue light remains readable. If the scene becomes too busy, simplify the background during a revision while preserving the original pose and clothing identity.
Tips for a Strong X-Ray Portrait Edit
Small creative choices can make the difference between a convincing result and a generic filter. Start with contrast: a deep gray, black, or muted street background helps the blue skeleton remain visible. A bright white wall may flatten the effect unless the glow is carefully separated from the background.
Use directional light: Soft side lighting creates shape on the face and clothes while giving the artificial glow a believable place to sit.
Keep styling simple: Solid jackets, shirts, or tops usually produce cleaner transparency than busy patterns and reflective layers.
Choose a confident pose: A relaxed stance, clear shoulders, and visible hands help the AI maintain realistic anatomy.
Control the color: Blue and cyan highlights are effective, but too many neon colors can make the image look like a game graphic.
Inspect details closely: Look at fingers, teeth, sunglasses, hair, jacket seams, and the edges where the subject meets the background.
Use a restrained finish: Moderate grain, film contrast, and a soft vignette can add polish without hiding mistakes.
For a stronger thumbnail, place the brightest glow around the chest or shoulders and keep the face slightly calmer. This creates a visual path from the headline area toward the subject while preserving a recognizable expression.
X-Ray Photo Editing Approaches Compared
Approach
Best for
Visual character
Main priority
Subtle transparent overlay
Profile posts and portraits
Clean, modern, believable
Identity preservation
Bright blue skeleton glow
Reels and short videos
High contrast and instantly visible
Scroll-stopping impact
Cinematic street portrait
Fashion edits and covers
Moody, editorial, atmospheric
Lighting and composition
Dark sci-fi treatment
Creative artwork and themed posts
Futuristic and dramatic
Color control and clean edges
There is no single correct treatment. A subtle version often looks more premium, while a brighter result may perform better in a fast-moving feed. Match the intensity to the platform, audience, and purpose of the image rather than choosing the strongest effect automatically.
Common X-Ray Photo Editing Mistakes
The most common problem is asking for too many dramatic changes at once. If an instruction demands a new face, a different body shape, intense neon light, complex architecture, and a visible skeleton, the generator may sacrifice the details that make the portrait feel authentic.
Another issue is poor source quality. A blurry image gives the tool less information about facial features and anatomy, so the final result may contain soft eyes, warped fingers, or an uneven torso. Begin with the clearest available portrait and crop only after the main transformation looks correct.
Overexposure can also weaken the concept. When every bone shines at maximum brightness, the image loses depth and the clothing becomes difficult to understand. Use a hierarchy: keep the face and silhouette natural, make the skeleton visible, and reserve the strongest highlights for selected areas.
Finally, do not publish the first output without reviewing it. Zoom in, compare it with the original, and make targeted corrections. A short refinement pass can fix anatomy, preserve identity, and turn a novelty effect into a professional-looking creative edit.
X-Ray Photo Editing FAQs
What is the best x-ray photo editing app?
The best tool depends on whether you want a quick filter or detailed control over identity, lighting, and anatomy. An AI image editor with image-to-image guidance is generally more flexible than a one-tap effect because you can refine the reference, composition, and intensity.
How do I make a realistic X-ray photo with AI?
Start with a sharp portrait, describe the transparent skeleton effect clearly, and ask the generator to preserve the face, pose, proportions, and clothing. Use soft lighting, a controlled blue glow, and a dark background so the result feels photographic rather than illustrated.
Can x-ray photo editing preserve my face?
It can, especially when the uploaded reference is clear and the instructions explicitly protect facial identity. Always inspect the eyes, jawline, nose, mouth, and skin texture because some tools may subtly change these details during generation.
Is an AI X-ray portrait a real medical image?
No. It is a creative visual effect that imitates selected features of radiographic imagery. It cannot show real internal health information and should not be used for medical interpretation or diagnosis.
Final X-Ray Photo Editing Takeaway
A compelling x-ray photo editing result depends on more than a glowing skeleton. The source portrait, pose, lighting, background, identity protection, and final cleanup all work together to create a believable image. Begin with a strong reference, choose a clear visual direction, and refine the output instead of relying on a single automatic result.
Use the two prompt blocks as a starting point for a realistic portrait or a cinematic street-style transformation, then adapt the intensity to your audience and platform. Try your best portrait today and create an X-ray photo editing post that gives viewers a reason to stop, look, and share.
Leave a Reply